

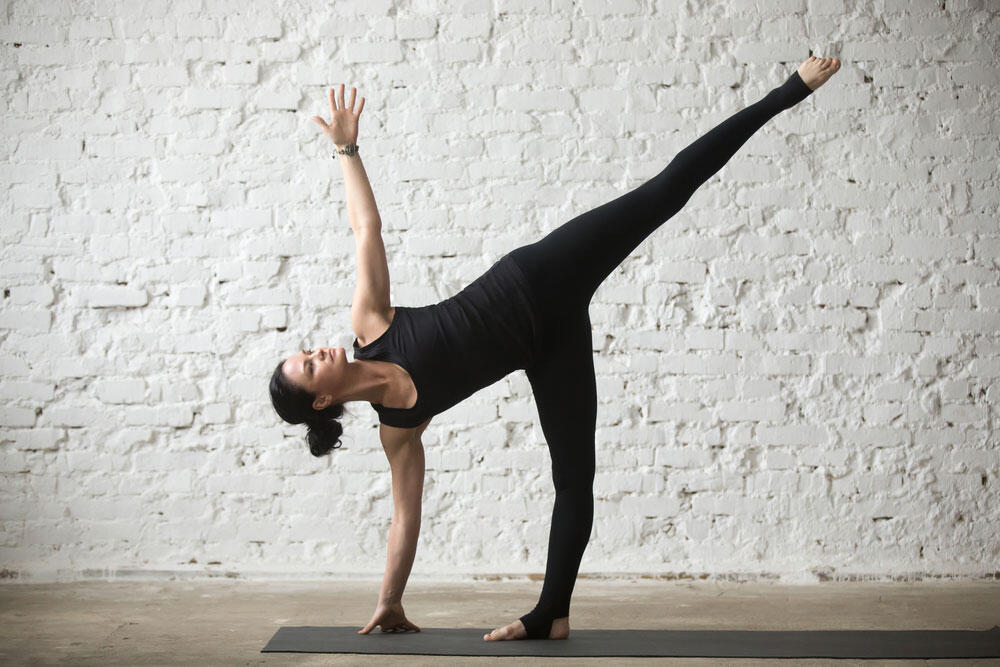
Half Moon Pose (Ardha Chandrasana) is a standing balance on one leg. One hand rests on the floor or a block, and the other leg lifts until it’s parallel to the floor. Your top arm reaches for the ceiling as your chest turns open.
Yoga Journal calls it a challenging posture that tests your balance. The good news is that a block, a wall, or a chair makes it accessible at almost any level. Here’s how to build it safely, with the benefits, variations, and cautions to know first.


What Is the Half Moon Pose in Yoga?
It’s a one-legged standing balance that works the whole body. Yoga Journal usually places it in the middle of a series of standing poses, often right after Triangle Pose. The table below sums it up.
Quick facts
The Pose at a Glance
| Detail | Information |
|---|---|
| Sanskrit name | Ardha (half) + chandra (moon) + asana (pose) |
| Pronunciation | are-dah chan-DRAHS-anna |
| Pose type | Standing balance |
| Targets | Full body |
| Usual starting point | Extended Triangle Pose |
| Useful props | Yoga block, wall, or chair |
| Main focus | Balance, leg strength, and an open chest and hips |
Source: Yoga Journal’s pose guide. Full references in the Sources section.
In the full shape, your standing leg and bottom hand root down while the lifted leg and top arm extend away. Your limbs stay in one plane, like the outline of a moon hanging in the sky.
What Does the Sanskrit Name Mean?
Ardha means half. Yoga Journal translates chandra as glittering, shining, or having the brilliance of light, usually rendered as moon. The full name is pronounced “are-dah chan-DRAHS-anna.”
The name carries an idea about balance. Yoga Journal describes the pose as drawing on the calm, cooling energy of the moon and the fiery, intense energy of the sun. You feel both as you root down through one leg and reach out through the other.
In Half Moon Pose, two opposing movements are happening at once: You are rooting down into the earth with your standing leg while simultaneously lifting and extending your raised leg into space.
Nikki Costello, certified Iyengar Yoga teacher, in Yoga Journal
How Do You Do It Step by Step?
Start in Extended Triangle Pose and bend your front knee to shift your weight forward. Place your hand on the floor or a block under your shoulder, then lift your back leg until it’s parallel to the floor. Turn your chest open, reach your top arm up, and breathe.
Step by step
Five Steps Into the Pose
| Step | Action | Key cue |
|---|---|---|
| 1 | Start in Extended Triangle Pose | Top hand on your hip, gaze down |
| 2 | Bend the front knee and shift your weight forward | Hand under your shoulder, on the mat or a block |
| 3 | Lift the back leg as the standing leg straightens | Raised thigh parallel to the floor |
| 4 | Turn your chest open and reach the top arm up | Top hip stacked over the bottom hip |
| 5 | Hold, then return to Triangle and switch sides | Steady breath; same hold on both sides |
Adapted from Yoga Journal’s instructions. Full references in the Sources section.
Step 1: Set Up in Triangle Pose
Begin in Extended Triangle Pose (Utthita Trikonasana), one of the common yoga asanas, with your right foot forward. Bring your left hand to your left hip. Turn your head to look down at the floor.
Step 2: Shift Your Weight Forward
Bend your right knee and shift your weight into your right foot. Reach your right hand a little forward and place it on the mat or a block, directly beneath your right shoulder. Press down through your fingertips to steady yourself.
Teacher Nikki Costello suggests pausing here for a few breaths. Let your back foot barely touch the floor while your standing leg starts to feel solid and stable.
Step 3: Lift Your Back Leg
Lift your left leg until your thigh is parallel to the floor. Costello’s cue is to straighten the standing leg at the same speed as the back leg rises. Extend through your left heel, and keep a slight bend in your right knee so it doesn’t hyperextend.
Step 4: Open Your Chest
Keep your standing leg steady as you turn your chest toward the right. Stack your left hip over your right hip, then reach your left hand toward the ceiling. Keep your gaze on the floor, or slowly bring it to your top hand once you feel steady.
Step 5: Come Out and Switch Sides
Hold the pose for a few steady breaths, for as long as your form stays clean. To come out, lower your left leg and return to Extended Triangle the same way you came in. Then repeat on the other side, since practicing both sides helps work on postural imbalances.
beenhereBeginner’s tipCan’t reach the floor comfortably? Rest your hand on a block at its tallest height. As your balance steadies, lower it to the middle height, then to the lowest one.
What Are the Benefits?
Its main gift is better balance. Yoga Journal also says it helps counteract the effects of sitting. Each leg does a different job, so both get stronger:
- Core: It strengthens your core muscles.
- Standing leg: It strengthens your thigh and ankle and stretches your hamstrings and glutes.
- Lifted leg: It stretches your groin and hip flexors, including the psoas, and strengthens the outer thigh and glutes.
- Both sides: Standing on one leg at a time helps strengthen both legs evenly.
Balance and Focus
Research on yoga in general supports the balance benefits. The National Center for Complementary and Integrative Health (NCCIH) cites a 2014 review of yoga in healthy people. Most of the studies showed better results on at least one measure of balance.
Studies showing better balance
11of 15 studies in healthy people showed improvement in at least one balance outcome, in a 2014 review cited by the NCCIH
Costello adds that the pose can train you to stay focused during challenging transitions. If you fall out of it, simply come back to your breath and try again.

Which Muscles Do the Work?
Orthopedic surgeon Ray Long breaks down the anatomy in Yoga Journal. Your hip abductors lift the back leg: the gluteus medius, gluteus minimus, and tensor fascia lata. The quadriceps straighten the standing knee.
Up top, the rhomboids draw your shoulder blades toward your spine and turn the chest upward. On the bottom arm, the serratus anterior helps you reach toward the floor.
Modifications and Props
Props let you learn the shape before you have the balance for it. A wall and a chair are the most useful.
Use a Wall
Stand with your back against a wall and set up as before, with a block in front of your front foot. Reach your bottom hand to the block as you lift your back leg. Let your raised foot, hip, and head rest against the wall.
Costello says the support lets you lift the leg higher and explore a fuller opening. Don’t collapse onto the wall, though. As you progress, you may only need the back of your raised heel against it.
Use a Chair
To make the pose easier on your lower back, place your hand or forearm on the seat of a chair. Lift your leg as high as you can without forcing it. You can also rest your lifted leg on the chair back, padded with a blanket, with your bottom hand on a block.
beenhereMake room to fallYou’ll probably wobble out of the pose a few times while you learn it. Clear the space around your mat so a lost balance doesn’t lead to a bump or a fall into furniture.
How Can You Vary the Pose?
Once the basic shape feels steady, these variations shift the focus toward strength, flexibility, or a twist.
Variations
Four Ways to Practice Half Moon
| Variation | How it works | Best for |
|---|---|---|
| Knee down | One knee on the floor, bottom shin extended behind you | Building strength before balance |
| Chair-supported | Hand or forearm on a chair seat, or the lifted leg on the chair back | An easier load on the lower back |
| Sugarcane Pose | Bend the top leg and hold the top foot | A quad stretch and a backbend |
| Revolved Half Moon | Square the hips to the floor and twist the chest the other way | Core strength and a balancing twist |
Variations as described by Yoga Journal and its contributing teachers. Full references in the Sources section.
Knee-Down Half Moon
Try the pose with one knee on the floor and the bottom shin stretched straight behind you like a kickstand. Yoga Journal recommends it when you want to focus on strength more than balance.

Keep your hips stacked and your top arm reaching up, just as you would in the standing version.
Sugarcane Pose
For a quad stretch, bend your top leg and reach back for your top foot. Yoga Journal calls this Chapasana, or Sugarcane Pose, and notes that it’s more of a backbend. Teacher Amy Ippoliti names it Ardha Chandra Chapasana and says it opens the hamstrings, hip flexors, and chest.
Revolved Half Moon
In Revolved Half Moon (Parivrtta Ardha Chandrasana), you square your hips toward the floor and twist your chest the other way. Teacher Tias Little explains that it demands a lot from the hamstrings, pelvis, sacrum, and lower back. It also requires considerable core strength, so a block or chair under your hand is a smart start.
Which Poses Help You Prepare?
Yoga Journal suggests stretching your hamstrings and practicing poses that challenge your balance. It lists Extended Triangle and Tree Pose (Vrksasana) as preparatory poses.

If your chest or hips feel tight from sitting at a desk, add a few hip openers first. They make it easier to rotate your torso. In Standing Forward Bend, practice pressing your fingertips into the mat, since that action steadies you in Half Moon.
Afterward, Yoga Journal suggests counter poses such as Standing Forward Bend (Uttanasana) and Wide-Legged Standing Forward Bend (Prasarita Padottanasana).
Who Should Modify or Skip This Pose?
Yoga is generally safe for healthy people who practice properly with a qualified instructor, according to the NCCIH. Injuries can still happen, most often sprains and strains of the knee or lower leg. Serious injuries are rare.
- Health conditions: Some conditions may call for modified poses. The NCCIH lists knee or hip injuries, lumbar spine disease, severe high blood pressure, balance issues, and glaucoma.
- Pregnancy: Check with your health care provider first, and adapt poses as needed.
- Older adults: The rate of yoga injuries treated in emergency departments is higher after age 65, so take extra care.
- Trouble balancing: Keep your gaze straight ahead rather than turning it up.
- Side-bending too far: Place a block under your bottom hand instead of reaching for the floor.
In every case, talk with your health care provider and your yoga teacher about your needs. Stop if a movement doesn’t feel right.
beenhereMedical noteThis article is for general education and isn’t medical advice. Talk to a licensed health care professional before starting a new exercise practice.
Sources
- Costello, Nikki. "Get Grounded and Practice Balance in Half Moon Pose (Arda Chandrasana)." Yoga Journal, 17 June 2013, updated 2 Sept. 2021. Available at: https://www.yogajournal.com/practice/beginners/how-to/half-moon-pose/. Accessed 1 Oct. 2026.
- "Half Moon Pose: How to Practice Ardha Chandrasana." Yoga Journal, featuring Natasha Rizopoulos and Ray Long, updated 25 Feb. 2025. Available at: https://www.yogajournal.com/poses/half-moon-pose-3/. Accessed 1 Oct. 2026.
- Ippoliti, Amy. "Challenge Pose: Ardha Chandra Chapasana (Half Moon Sugarcane Bow Pose)." Yoga Journal, 28 Sept. 2017. Available at: https://www.yogajournal.com/poses/challenge-pose-ardha-chandra-chapasana/. Accessed 1 Oct. 2026.
- Little, Tias. "Master Class: Revolved Half Moon Pose (Parivrtta Adha Chandrasana)." Yoga Journal, 28 Aug. 2007. Available at: https://www.yogajournal.com/practice/yoga-sequences/to-the-moon/. Accessed 1 Oct. 2026.
- Smith, Logan. "Yoga How-To: The Half-Moon Pose." WebMD, medically reviewed by Shruthi N, MD, 22 Aug. 2024. Available at: https://www.webmd.com/fitness-exercise/yoga-how-to-the-half-moon-pose. Accessed 1 Oct. 2026.
- "Yoga: Effectiveness and Safety," National Center for Complementary and Integrative Health, National Institutes of Health. Available at: https://www.nccih.nih.gov/health/yoga-effectiveness-and-safety. Accessed 1 Oct. 2026.
Summarize with AI:
Did you like this article? Leave a rating!

 Loading...

