

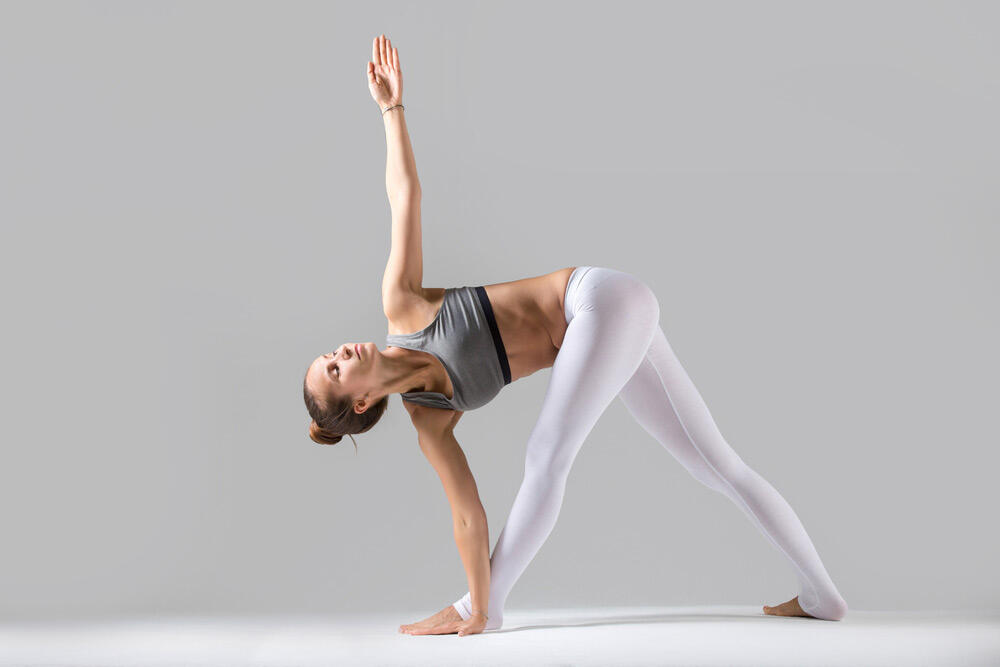
Revolved Triangle (Parivrtta Trikonasana) is a standing twist. You hinge over your front leg, bring the opposite hand down by your front foot, and reach your other arm to the ceiling. Yoga Journal calls it a counterpose to Extended Triangle and a preparation for seated forward bends and twists.
The pose asks for long hamstrings, a grounded back heel, and steady focus. Yoga Journal senior editor Renee Schettler puts it plainly: Revolved Triangle isn’t easy. The steps, props, and cautions below help you build it safely, one side at a time.
At a glance
Parivrtta Trikonasana Basics
| Detail | What to know |
|---|---|
| Sanskrit name | Parivrtta Trikonasana |
| Pose type | Standing twist |
| Stance | Feet about 3 to 4 feet apart |
| Main areas | Legs, hips, spine, and chest |
| Props | Block, chair, wall, or strap |
| Hold | 30 to 60 seconds on each side |
Based on Yoga Journal and yoga teacher Richard Rosen, checked Oct 1, 2026. Full references in the Sources section.
Most of the work happens in your legs and the middle of your back. Your neck stays relaxed, and your gaze can stay low until your balance feels secure.


What Does Parivrtta Trikonasana Mean?
The Sanskrit name is pronounced par-ee-vrit-tah trik-cone-AHS-anna, according to Yoga Journal. It joins two words that describe the shape of the pose.
- Parivrtta: to turn around or revolve
- Trikona: three angle, or triangle
In Extended Triangle (Utthita Trikonasana), your chest opens away from your front leg. In Revolved Triangle, you rotate your torso the other way, so your chest turns toward the front leg. Your opposite hand then lands by your front foot.

How to Do Revolved Triangle Step by Step
The pose has five stages, and each one depends on a firm back heel. The steps below twist to the right. Breathe slowly: lengthen your spine as you inhale, and turn as you exhale.
Step 1: Set Your Stance
Stand at the top of your mat in the standing Mountain Pose (Tadasana). Step or lightly jump your feet about 3 to 4 feet apart. Raise your arms parallel to the floor, palms facing down.
Turn your right foot out 90 degrees and your left foot in about 45 degrees. Line up your right heel with your left heel. Straighten both legs and press your left heel firmly into the floor.
Step 2: Hinge and Twist
Exhale and turn your torso to the right, over your front leg. Hinge from your hips rather than your waist. Bring your left hand down to the floor outside your right foot, or onto a block if the floor feels far away.
Press your left palm down for support. Press your back heel down even harder, and keep both legs straight.
Step 3: Raise Your Top Arm
Keep turning your torso to the right and stretch your right arm toward the ceiling. Line it up with the tops of your shoulders. Draw your shoulder blades in and broaden your chest.
Keep most of your weight from drifting onto your front leg. Push back through your left heel to stay steady, and keep your back long rather than rounded.
Step 4: Choose Your Gaze
If you feel steady, look softly up at your right thumb. If you wobble, keep your head neutral or look down at the floor. Either way, reach your arms away from each other in one long line.
Step 5: Hold, Release, and Switch Sides
Stay for 30 to 60 seconds. To come up, inhale, press your back heel into the floor, and reach your top arm toward the ceiling. Reverse your feet and repeat on the left side for the same length of time.
If your bottom hand can’t reach the floor, hold your shin or ankle instead. You can also rest your hand on a block beside your front foot. Yoga Journal suggests that beginners place the hand by the inner edge of the foot and use a slightly narrower stance.
How long to hold Revolved Triangle on each side
seconds, according to Yoga Journal
Who Should Avoid Revolved Triangle?
People with low blood pressure, migraines, headaches, diarrhea, or insomnia should skip this pose, according to yoga teacher Richard Rosen. Other health conditions call for care and a few changes.
- Back or spine injury: Rosen advises practicing only under the supervision of an experienced teacher.
- Osteoporosis: The Bone Health & Osteoporosis Foundation advises avoiding forward bends from the waist and twisting to a point of strain.
- Pregnancy: NCCIH advises talking with your health care provider and yoga teacher first, since some poses may need changes.
- Age 65 and over: NCCIH reports a higher rate of yoga injuries treated in emergency rooms in this group, so move slowly.

The National Center for Complementary and Integrative Health (NCCIH) recommends learning yoga with a qualified instructor. That’s especially useful for a demanding twist like this one, where small alignment errors add up.
Modifications, Props, and Partner Work
Keeping the back heel down is one of the hardest parts of this pose. A slightly narrower stance makes it easier to press through that heel. Widen your feet again as the pose becomes familiar.
Props make the pose easier to learn. You can rest your bottom hand on a block at any height, or on the seat of a sturdy chair. Another option is to wedge your back heel against a wall and push into it for extra stability.
Deepen the Twist
Once the basic shape feels stable, place your bottom hand outside your front foot. Press your forearm firmly against your outer shin. That pressure gives you leverage to rotate your torso further.
Practice With a Partner
A partner can help you keep your legs stable while you twist. Wrap a strap across the crease of your front hip and hand the ends to a partner standing behind you. As you come into the pose, your partner pulls on the strap to deepen the twist.
Your partner can also press a foot against your back heel. That support helps you keep the heel grounded on the mat.
What Are the Benefits of Revolved Triangle?
Revolved Triangle strengthens and stretches the legs, opens the chest to improve breathing, and relieves mild back pain, according to Yoga Journal. It also improves your sense of balance. Richard Rosen adds that it stretches the hips and spine and stimulates the abdominal organs.
- Legs: stretches the hamstrings while the legs work to hold you steady
- Upper back: works the thoracic spine, the middle and upper back
- Breathing: opens the chest
- Focus: builds concentration, or ekagrata, which means one-pointed focus
The tendency for most of us is to twist where it’s easy and avoid twisting where it’s not.
Natasha Rizopoulos, yoga teacher and Yoga Journal contributor
Rizopoulos explains that most people overwork the neck, which moves easily. Meanwhile, the middle and upper back do too little. Keep your neck relaxed, and let the turn come from your ribcage.
Research on yoga in general backs some of these benefits, though modestly. NCCIH reports that yoga may help low-back pain slightly more than no exercise. Its effects were similar to those of other types of exercise.
Variation: Revolved Half Moon Pose
From Revolved Triangle, you can move into Revolved Half Moon Pose (Parivrtta Ardha Chandrasana). It adds a one-legged balance to the twist. Yoga teacher Tias Little notes that it calls for considerable strength and patience.
- Step in: Twisting to the right, bend your right knee and take a small step in with your back foot.
- Place your hand: Put your left hand on the floor or a block, just ahead of your front foot and under your shoulder.
- Lift and balance: Shift your weight forward, then straighten your right leg as you lift your left leg to hip height.
- Open up: Reach your right arm toward the ceiling, turn your gaze toward that hand, and stay for 5 to 10 breaths.
To come out, bring your top hand to your hip and slowly bend your standing knee. Lower your back leg to the floor, then repeat on the other side.
Sources
- "Revolved Triangle Pose: How to Practice Parivrtta Trikonasana," Yoga Journal, 2025. Available at: https://www.yogajournal.com/poses/revolved-triangle-pose-2/. Accessed 1 Oct. 2026.
- "Extended Triangle Pose: How to Practice Utthita Trikonasana," Yoga Journal, 2026. Available at: https://www.yogajournal.com/poses/extended-triangle-pose/. Accessed 1 Oct. 2026.
- "Richard Rosen’s Asana Breakdown: Parivrtta Trikonasana," Richard Rosen, Nest Yoga, 2019. Available at: https://www.nest-yoga.com/blog/2019/10/6/richard-rosens-asana-breakdown-parivrtta-trikonasana. Accessed 1 Oct. 2026.
- "Master Class: Revolved Half Moon Pose (Parivrtta Adha Chandrasana)," Tias Little, Yoga Journal, 2007. Available at: https://www.yogajournal.com/practice/yoga-sequences/to-the-moon/. Accessed 1 Oct. 2026.
- "Yoga: Effectiveness and Safety," National Center for Complementary and Integrative Health, National Institutes of Health. Available at: https://www.nccih.nih.gov/health/yoga-effectiveness-and-safety. Accessed 1 Oct. 2026.
- "Frequently Asked Questions," Bone Health & Osteoporosis Foundation. Available at: https://www.bonehealthandosteoporosis.org/patients/patient-support/faq/. Accessed 1 Oct. 2026.
Summarize with AI:
Did you like this article? Leave a rating!

 Loading...

