

If you’re studying music, learning guitar is a great place to start. It’s the perfect instrument on which to learn how to play your favorite pieces of music.
As soon as you know the basics of the instrument - guitar tablature, the odd chord, and a bit of the fretboard - you can begin composing and jamming straightaway.
Whilst the building blocks of music theory are the different notes, scales - from the major scale to the variations on the minor scale - and the ability to read music, for beginner guitar the methodology conventionally works a little differently. Particularly if you are playing rock guitar or folk guitar.
Here, the most fundamental thing will be chords - power chords, open chords, barre chords, major chords, and minor chords - and chord progressions, the way that we string different chords together. These will provide the basis of your favorite songs, and are an essential part of the repertoire of all guitar players.
If you want to learn how to play guitar, you need to get to grips with the guitar chord in all its variations. It’s impossible to avoid and it’s important to learn the proper finger positions for the chords so that you can learn how to play a whole series smoothly and quickly.
Once you can do that, you can really say that you’re a guitar player.





What are Guitar Chord Progressions?
Few chords, no matter how pretty they sound in isolation, are played that way in actual songs. It’s much more common for songs to group several chords together into guitar chord progressions to develop an interesting sound. They’re part of the language of music, the proverbial sentences to the words that we know as individual chords.
These progressions are standardized and use chords you’re likely familiar with, so learning said basic progressions will grant you the ability to play along to songs you don’t yet know, jam with strangers, and take on some challenging gigs.
That is, if you’re able to pick up on the chord progressions themselves. We’ll start by teaching you a few of the most recognizable ones so you can begin training your fingers and your ears. With time, you’ll be able to recognize these progressions as soon as someone plays the first couple of chords.
How To Play Your First Guitar Chord
Now, let's move onto those chords, shall we?
On the guitar, there are tons of fingering combinations that will give you the notes you need. Today, we're going to concentrate on the four you can play near the top of the guitar neck. These are open-position chords, and, in a few cases, might involve a bit more stretching than you're used to.
The A Minor 7 Chord
This chord consists of four notes: A, C, E, and G.
Am7 Configuration 1
- Place finger 1 on the 6th string/5th fret
- Place finger 2 on the 4th string/5th fret
- Place finger 3 on the 3rd string/5th fret
- Place finger 4 on the 2nd string/5th fret
- Mute strings 1 and 5
Am7 Configuration 2
- Place finger 1 on the 4th string/2nd fret
- Place finger 2 on the 5th string/3rd fret
- Place finger 3 on the 6th string/5th fret
- Place finger 4 on the 2nd string/4th fret
- Mute string 1
Am7 Configuration 3
- Place finger 1 on the 4th string/5th fret
- Place finger 2 on the 3rd string/5th fret
- Place finger 3 on the 2nd string/5th fret
- Play string 5 open
- Mute strings 1 and 6
If your chord sounds muddy at first, play it broken (note by note). This will allow you to identify which of the strings is giving you trouble.
Am7 Configuration 4
- Place finger 1 on the 2nd string/1st fret
- Place finger 2 on the 4th string/2nd fret
- Place finger 3 on the 3rd string/2nd fret
- Place finger 4 on the 1st string/3rd fret (or leave string 1 open)
- Play string 5 open
- Mute string 6
The C Major Guitar Chord
Arguably the easier of these two chords, C Major consists of three notes: C, E, and G.
There's one classic configuration that most beginners go to, which is the first one we'll cover here. There are also two other variants that you can play at the top of the guitar neck:
C Configuration 1
- Place finger 1 on the 2nd string/1st fret
- Place finger 2 on the 4th string/2nd fret
- Place finger 3 on the 5th string/3rd fret
- Place finger 4 on the 1st string/3rd fret (or leave string 1 open)
- Play string 3 open
- Mute string 6
C Configuration 2
- Use finger 1 to cover strings 1 and 5 on the 3rd fret
- Place finger 2 on the 4th string/5th fret
- Place finger 3 on the 3rd string/5th fret
- Place finger 4 on the 2nd string/5th fret
- Mute string 6
C Configuration 3
- Place finger 1 on the 4th string/2nd fret
- Place finger 2 on the 5th string/3rd fret
- Place finger 3 on the 1st string/3rd fret
- Mute strings 2, 3, and 6
Common Guitar Chord Progressions
The first thing you’ll need to remember is that for every chord progression, there is a “root note,” also known as the “tonic.” For the purposes of our lesson today, we’re going to use “C” as our root, exploring several chord progressions in this key.
What's Next?
- The naming system of chord progressions
- Step-by-Step examples of each common progression
Nashville Numbering System
You can apply the progressions themselves, however, to different keys by starting on the appropriate root note and using the correct relative chords.
Interestingly enough, this is part of the reasoning behind the Nashville Numbering System, which stresses recalling the relationships between chords rather than the chords themselves.
To make a long story short, many a Nashville session musician couldn’t read music in the traditional sense, so they developed a chord shorthand descended from the European chord notation of the 18th Century.
The system, now known as the Nashville Number System, uses seven harmonic chord degrees, represented by Arabic numerals (1, 2, 3, 4, etc.).
Chord Progressions in Roman Numerals
While talking about our chord progressions today, we’ll stick to the traditional Roman Numerals, but keep in mind there are other ways of conveying this information, and you should be alarmed if you see chord progressions that look different than what you’re used to (like the Nashville System).
A simple way to think of your Roman Numerals is as follows. In any key, there are seven scale degrees, which are represented by the Roman Numerals. The chords associated with those scale degrees can be major or minor, so to depict major chords, we’ll use an uppercase Roman Numeral (I, II, III, IV, etc.), and to depict minor chords, we’ll use lowercase Roman Numerals (i, ii, iii, iv, etc.).
In some situations, some special symbols or notation may come into play, but we’ll deal with that on a case-by-case basis if necessary. The point is, your Roman Numerals tell you which chords you are playing (relative to the scale tones of a particular key). Let’s see how this all works with easy chord progressions in the key of C.
The I-IV-V Chord Progression (1-4-5)
We’ll start things easy with the “one,” “four,” “five,” progression. This, and several of its variants, are sprinkled all throughout pop, funk, rock, and blues-style music.
C Chord (1)
The progression begins with the “one,” which, as you’ll recall, is going to be “C” for today:
- Place your 1st finger on the 2nd string/1st fret
- Place your 2nd finger on the 4th string/2nd fret
- Place your 3rd finger on the 6th string/3rd fret
- Place your 4th finger on the 5th string/3rd fret
- Play strings 1 and 3 open
F Chord (4)
After playing the “one,” you’ll move to the “four,” which, in this case, is an F Major Chord. The bar on your first fret will do:
- Use your 1st finger to bar the strings on the 1st fret
- Place your 2nd finger on the 3rd string/2nd fret
- Place your 3rd finger on the 5th string/3rd fret
- Place your 4th finger on the 4th string/3rd fret
G Chord (5)
And you’ll wrap this progression up with your “five,” a G Major Chord in this case:
- Place your 1st finger on the 5th string/2nd fret
- Place your 2nd finger on the 6th string/3rd fret
- Place your 3rd finger on the 1st string/3rd fret
- Play strings 2, 3, and 4 open
You’ll find three-chord changes like this some of the most common in popular western music. You’ll also note that subtle variations on this formula are present in many a rock and blues tune, where alterations to some of the chords give rise to the blues harmonies that propelled the likes of Chuck Berry, Little Richard, The Beatles, and many other notables of the 50s and 60s to fame.
The I-V-vi-IV Chord Progression (1-5-6-4)
This is another cross-genre chord progression you’ll find when listening to artists throughout the ages. You might find those chords flipped in their order, or using a different starting position, but the sound of the “one,” “five,” “six,” “four” is unmistakable.
C Chord (1)
Here’s how you’ll do it in “C,” starting with your root:
- Place your 1st finger on the 2nd string/1st fret
- Place your 2nd finger on the 4th string/2nd fret
- Place your 3rd finger on the 6th string/3rd fret
- Place your 4th finger on the 5th string/3rd fret
- Play strings 1 and 3 open
G Chord (5)
Next comes the “five,” which you’ll recall is a G Major Chord:
- Place your 1st finger on the 5th string/2nd fret
- Place your 2nd finger on the 6th string/3rd fret
- Place your 3rd finger on the 1st string/3rd fret
- Play strings 2, 3, and 4 open
Now we’ll switch things up with the “six,” an A Minor Chord:
- Place your 1st finger on the 2nd string/1st fret
- Place your 2nd finger on the 4th string/2nd fret
- Place your 3rd finger on the 3rd string/2nd fret
- Play strings 1 and 5 open
- Mute string 6
Last is the “four,” your trusty F Major Chord:
- Use your 1st finger to bar the strings on the 1st fret
- Place your 2nd finger on the 3rd string/2nd fret
- Place your 3rd finger on the 5th string/3rd fret
- Place your 4th finger on the 4th string/3rd fret
You’ll hear this progression in pop-punk, in 50s rock songs, in numerous country tunes, and, in an altered form, you’ll be able to pick this progression out of pop songs like Lady Gaga’s “Poker Face” and Rihanna’s “Umbrella.”
The ii-V-I Chord Progression (2-5-1)
The “two,” “five,” “one,” is a staple of nearly every form of popular music, but you’ll often heard it mentioned when talking about jazz harmonies.
Instead of starting with the root, you’ll begin here with the “two,” a D Minor Chord:
- Place your 1st finger on the 1st string/1st fret
- Place your 2nd finger on the 3rd string/2nd fret
- Place your 3rd finger on the 2nd string/3rd fret
- Play string 4 open
- Mute strings 5 and 6
G Chord (5)
Next comes the “five,” which will be a G Major Chord:
- Place your 1st finger on the 5th string/2nd fret
- Place your 2nd finger on the 6th string/3rd fret
- Place your 3rd finger on the 1st string/3rd fret
- Play strings 2, 3, and 4 open
C Chord (1)
And finally, our “one,” the root, our C Major Chord:
- Place your 1st finger on the 2nd string/1st fret
- Place your 2nd finger on the 4th string/2nd fret
- Place your 3rd finger on the 6th string/3rd fret
- Place your 4th finger on the 5th string/3rd fret
- Play strings 1 and 3 open
If you are playing a jazz tune, you might notice that the “two” is a minor 7th chord and your “one” is a major 7th chord. It’s a subtle change, but makes a world of difference to the sound of this chord progression (and serves as a lesson in why the details matter when you’re playing music).
Pro Tips: Mastering Guitar Chord Progressions
Now that we’ve introduced you to a few common chord progressions, you might also want to learn a few tips that will come in handy while you’re practicing these chord groupings. First off, remember to start slowly, memorize your transitions, then slowly speed up while you’re committing these to memory.
One thing that might help with both your memorization efforts and your practice in trying to switch from one chord in a progression to the next smoothly is learning how these chord progressions sound. If you can commit the sounds to heart, you’ll be more likely to recall them correctly during your practice sessions and when you’re on stage.
Remember that even though we learned our chord progressions in the key of “C” today, you can apply those progressions to other keys, just so long as you remember the relationship between the root chord and the other chords in the progression.
For example, if we wanted to play the I-IV-V progression in “G,” our “one” would become G Major which means our “four” would be C Major, and our “five” would be D Major. Alternatively, moving the ii-V-I progression to “G” would make the “two” A Minor, the “five” D Major, and the “one” G Major.
Keep those relationships between scale tones in mind, and you should be able to move your chord progressions to any key with success.
A Step by Step Guide to Learning Chords
For most beginners, learning guitar can be a rocky journey - the strings hurt your fingers when you fret them, your right hand seems completely disconnected from your left, and there are tons of chords to learn which all seem impossible. The virtuosic flights of jazz guitar, or the guitar music of Hendrix, seem a long way off.
For anyone who’s trying to learn guitar, we’d recommend starting with the basic chords. By these we mean the 'open chord', the chord shapes that really on notes from strings that you don't fret ('open' strings). In most pop songs you'll see and hear these being played - from the C major to the E major or D major chord. These are opposed to the 'barre chord', which requires all of the strings to be fretted.
You will find that your index finger, middle finger, and ring finger will all hurt a little as you learn these shapes. You are pressing your fingers against metal wires after all.
But, if you keep going, the next step is learning to play them in a series, hitting the right notes, and creating a bit of fluidity… and of course, for your fingers to stop hurting when you play.
You can find tab sets in specialist magazines and on the internet - series of chords to play together and reproduce a piece of music. Many many many songs, you will find, follow the same chord progression - and these usually involve the open position chords. And, honestly, once you have nailed these basic guitar chords, you'll be able to play really a lot of guitar songs. If you don't believe us, check out this video here.
But how do you put two chords together without losing your rhythm? How do you keep adding on chords until you’re actually playing a whole piece of music?
Here are a few tips.
A Few Things All Chords Have in Common.
When you are first starting out and you have to stare at a different chord chart every time you search for different guitar tabs, chords can all look overwhelmingly different. However, they aren't.
Because the secret of effective rhythm guitar is actually efficiency - by which we mean specifically the efficiency of your movements. From a major chord to a minor chord there is usually only the difference of one note - and the best guitar players around know how to make these movements incredibly efficiently.
The secret here is knowing your fret board - and knowing where the notes are in a chord.
Know Your Chords Well, and Know How to Recognize Them.
To really achieve fluidity in your playing and begin putting chords together, you need to start by recognizing the common factors.
- Two consecutive chords might have one or more finger positions in common, so you might be able to get to the next chord without moving all of your fingers. Efficiency here is the name of the game.
- If the shape of two chords is the same, but is up or down by one or two frets, don’t change the shape of your hand. Just pick up and move your whole hand along the frets.
Check for exceptional guitar lessons near me.
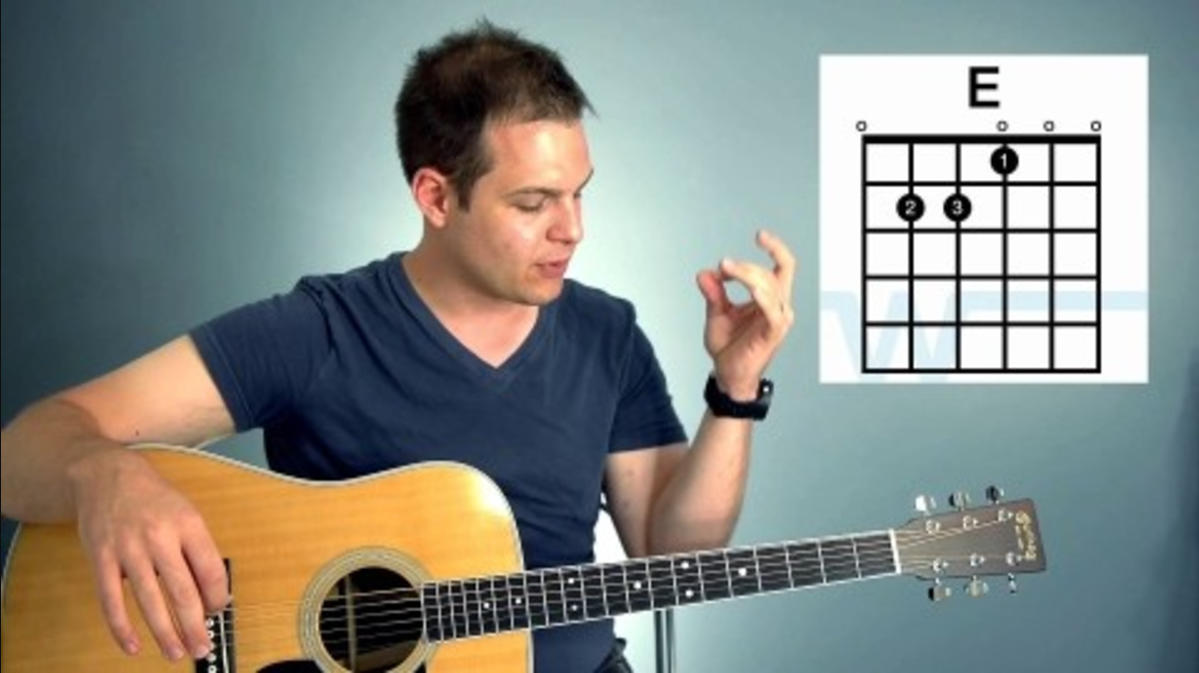
- If the finger position for the chords is the same, but just on different strings (say the E major chord and the A minor chord), there is no need to change your hand shape. Just practicing moving your fingers together as a group.
- Some notes are the same, but the finger positions change. Here you can have a play and try out new finger positions so that the chords have a few fingers in common. You might find it helpful to pivot around a particular finger (try this with your ring finger when moving from a D major chord to a G major)
- Sometimes there’s nothing in common between the chords, and you just need to learn the movements by heart to make the transition as fluid as possible. Learning to read tabs will help.
Why do this?
If you look closely at the different chords you’re trying to play, you can benefit from the points in common. Finding these points can help to reduce your movements and improve the fluidity of your playing.
By finding the commonalities between easy guitar chords, you'll improve your fluidity in hand with your efficiency.
Work on Your Fingers to Improve Your Playing
If some of your fingers stay the same between chords, try to keep them perfectly still while you’re moving the rest of your hand.
If you’re just picking up and moving your hand along without changing finger positions, make sure you aren’t moving your fingers as you move your hand. Even in the air your fingers should still stay in position.
By practicing these tips your hand will begin to anticipate the movement of your fingers and your playing will improve.
With any new guitar technique, there will be exercises to help you to develop your dexterity. Practising moving your hand in different positions across the guitar neck will help you massively.
Break a Movement Down
If two chords contain open notes, it’s an opportunity to play notes that are already there without actually having to put your fingers down. The open string is really a bit of a gift to guitar players to improve the efficiency of the movement.
Learn how to dissect the positions. Check to see if you can play the note without having to add any extra fingers. Studying the chord diagrams and finding ways to play that are most comfortable for you will help.
You’ll save time, and playing a series of chords together will become second nature.
Changing between Chords.
Putting two chords together is composed of up to six small steps that you can adjust based on your level.
First, learn all of your chords by heart, and then work on changing from one chord to another.

It’s impossible to learn how to change chords and put them together all in one go, even in many a guitar lessons.
In summary, here's how to do it:
- Make the first chord with your left hand.
- Slowly change the position of your fingers to create the second chord - making sure that the chords you are making are the same positions as on the chord charts.
- Look at the positions of your fingers - are they the same? are your fingers crossing? are there any that don’t require moving at all?
- Go back and forth between the second and the first chord, slowly going forwards and backwards. Keep your fingers relaxed and as close to the guitar strings as possible to conserve your movements.
- It’s important to practice the transitions between the chords really slowly in order to gain muscle in your fingers, and to begin to build muscle memory.
- Then, you can begin to increase the speed and volume of your playing.
- Repeat this over and over until it becomes comfortable. The goal is that the movements become second nature and instinctive, and that you stay relaxed.
- The last step is to repeat the whole exercise, but to strum the strings of the guitar with your right hand so that you can hear the chords.
- To check to see if you have the right notes, play each individual string and check its sound.
- This will help you get ready to play arpeggios!
Memorizing Guitar Chords
Now that you know the chord shapes, it's time to get serious about committing them to memory. There are many ways to practice new chords, but, when starting out, try working on making the shapes before strumming.
Make the shape you're trying to learn, then take your fingers off the fretboard. Wait twenty to thirty seconds, then see if you can make the shape again. While you're doing this, visualize the chord's shape and how it feels when your fingers make it. This will help you memorize the chord faster.
Strumming Guitar Chords
With the chord shapes memorized you can get to work on strumming one after the other. This is where your metronome will lend a hand. Start practicing slow, in 4/4 time, switching between chords at low BPMs. Once you can switch at a reduced pace, start cranking up the speed. You don't need to rush; increase by 5-10 BPMs at a time.
Once you've mastered simple strumming at higher speeds, you can start experimenting with advanced patterns. Try something funky. Try something rock-n-roll. Try as many styles as you can until you've mastered these chords. With the chords securely "under your belt," move on, and start using them in a song or two. Students who want guidance as they explore different styles can benefit from private guitar lessons.
Tips and Tricks for Putting Chords Together
Practice regularly
Listen well - if you want to be able to play guitar like Eric Clapton, Bob Dylan, or even Ben Harper, the most important thing that you can do is to practice regularly.
What do we mean by that? How often do you need to practice guitar to begin playing well? Professional guitarists advise students to practice daily, or every other day, for 10 to 15 minutes so that the movements begin to become automatic and second nature. Then your muscle memory can take over when you’re moving your fingers between chords.
Get Help from a Guitar Teacher
If you aren’t motivated to practice on your own, or you’re having trouble mastering the chords, ask a professional for help. They can guide you through the process in private lessons or finding online guitar lessons for kids and give you advice on how to improve.
They will show you if you’re sitting badly or picking up bad habits, and correct you where need be. Personalized feedback through private guitar lessons can help identify poor habits and improve your technique.

Having a teacher will help generate immediate feedback on how you’re doing - they can mirror you, and your learning will be considerably enriched.
So start looking for guitar lessons NYC to find the perfect teacher!
Keep the Beat
Keeping a consistent rhythm is a crucial part of playing guitar, and you need to keep the beat when you change chords.
Don’t slow down to change chords and learn how to play with a metronome. This way, you won’t need to think too hard about the beat. Instead you’ll learn to keep a steady, even rhythm and play your chords.
Once you’ve mastered the two chords and your movements are smooth and easy, get a stopwatch to time yourself as you move up and down the neck of the guitar.
Always give preference to quality over quantity - it’s always better to make five clean chord changes in one minute, than to try and get 15 chord changes in, but the sound is all wrong.
Pay Attention to Your Breathing
We’re not talking about your physical breathing, but about the small pauses between chords when you let the strings vibrate and you move on to the next position.
This pause should always happen between chord changes, and especially on the last note of a measure.
If you want to get technical when you’re using a pick and changing between two chords, instead of playing both with your pick, leave the last note of the measure empty and use the time to get your left hand ready.
Visualize the Changing Chords
Learn to visualize changing chords.
Close your eyes and picture your fingers in the correct position, and then picture them changing to the next chord.
Focus on that mental image; it will help get your brain ready for the movement, and make the actual action smoother and easier.
If possible, use the fingers that aren't holding strings as a ‘pivot’ to change positions between chords.
And don’t forget to stay motivated and enjoy playing the guitar!
Summarize with AI:
Did you like this article? Leave a rating!


 Loading...